Chapter 4 Git, GitHub and RMarkdown
4.1 Learning outcomes
By the end of this practical you should be able to:
- Explain the use of and differences between Git and GitHub
- Create reproducible and open R code
- Produce RMarkdown documents that explain code and analysis
4.2 Homework
Outside of our scheduled sessions you should be doing around 12 hours of extra study per week. Feel free to follow your own GIS interests, but good places to start include the following:
Exam Each week we will provide a short task to test your knowledge, these should be used to guide your study for the final exam.
The task this week is to:
- Read in global gender inequality data
- Join the global gender inequality index to spatial data of the World, creating a new column of difference in inequality between 2010 and 2019. Note this download has become temperamental but the .geojson should work. Andy will provide the data if not.
- Share it with the World on GitHub
- Add you repository URL to the circulated spreadsheet
Tip the countrycode R package will be helpful!
Tip the gender inequality has changed in the last year, you will find what you need in the “All composite indices and components time series (1990-2021)” dataset, the metadata file beneath it will explain what the columns are.
Reading
This week:
Chapter 2 “Basics” from R Markdown: The Definitive Guide by Xie, Allaire and Grolemund (2019)
Chapter 2 “Why RMarkdown” from RMarkdown for Scientists by Tierney (2020).
Replication across space and time must be weak in the social and environmental sciences by Goodchild and Wenwen (2020).
The paper “Packaging Data Analytical Work Reproducibly Using R (and Friends)” by Marwick, Boettiger & Mullen (2018).
Watching
Hadley Wickham’s Keynote from the European Molecular Biology Laboratory (EMBL). This will be the same for a few weeks.
Karthik Ram’s “A guide to modern reproducible data science with R”
Remember this is just a starting point, explore the reading list, practical and lecture for more ideas.
4.3 Recommended listening 🎧
Some of these practicals are long, take regular breaks and have a listen to some of our fav tunes each week.
Andy Beautiful people will ruin your life! One of my favorite bands…the Wombats. Formed in 2003 at the Liverpool institute of performing arts. Just really talented musicians.
Adam What happens when two of the greatest MCs ever to pick up a mic get together to make some music? They only smash out a double album with some of the biggest producers in drum & bass and absolutely kill it! Yes, known to their mums as Delroy and Dominic, to the rest of us as DRS and Dynamite, it’s only Playing in the Dark by DRS and Dynamite!
4.4 Introduction
In this practical you will learn how to produce work that is open, reproducible, share able and portable using RStudio, RMarkdown, Git and GitHub. As more and more researchers and organisations publish associated code with their manuscripts or documents it’s very important to become adept at using these tools.
The tools you will use are:
RStudio is a graphical user interface (that you should already be familiar with) — it contains a number of features which make it excellent for authoring reproducible and open geographic data science work.
RMarkdown is a version of the Markdown markup language which enables plain text to be formatted to contain links to data, code to run, text to explain what you a producing and metadata to tell your software what kinds of outputs to generate from your markdown code. For more information on RMarkdown look here.
Git is a software version control system which allows you to keep track of the code you produce and the changes that you or others make to it.
GitHub is an online repository that allows anyone to view the code you have produced (in whatever language you choose to program in) and use/scrutinize/contribute to/comment on it.
4.5 Git and GitHub
The theory behind Git and Github was explained in the lecture and practical session.
Allison Horst has a series of graphics that will help understand the tools…
](allisonhorst_images/git_github.png)
Figure 4.1: A basic git workflow represented as two islands, one with local repo and working directory, and another with remote repo. Bunnies move file boxes from the working directory to the staging area, then with Commit move them to the local repo. Bunnies in rowboats move changes from the local repo to the remote repo (labeled PUSH) and from the remote repo to the working directory (labeled PULL). Source: Allison Horst data science and stats illustrations
4.5.1 The three ways
There are three ways to make your RStudio project work with GitHub
- Set up the GitHub repository, clone it to your Git then load it in RStudio — using Git GUI. This shows Git is separate software, but i do not recommend this way
- Create a new RStudio project and link it to GitHub — new version control. In this scenario you might make a new RProject and know from the start you want to put it on GitHub
- If you have an existing RProject then you can link them manually — existing project. In this scenario you might have already developed your project but then later decide to share it on GitHub.
I will show you all three, you should be able to do way 1, then way 2 using the same repository. Way 3 will have merge issues, so start with a fresh GitHub repository. It is useful if you have produced some code then want to share it at a later date. Follow what i do in the lecture.
My advice is to read the Git and GitHub parts of the practical before you start (until the RMarkdown section).
4.5.2 Set up your GitHub
If you are working on your own computer, you will first need to install Git — https://git-scm.com/ — if you are working on the UCL Remote Desktop, you won’t need to do this as it is already installed for you.
Go to http://github.com, create an account and create a new repository (call it anything you like - ‘gis_code’ or something similar):
- making sure it is public
- check the box that says ‘initialise new repository with a README’
- click ‘create repository’ at the bottom

- Your new repository (‘repo’) will be created and this is where you will be able to store your code online. You will notice that a README.md markdown file has also been created. This can be edited to tell people what they are likely to find in this repository.
4.5.3 Using RStudio with Git
In summer 2021 GitHub changed it’s authentication process to a token based system as opposed to a password based system. David Keys provided an excellent overview with some videos that documented this change and how to now set things up, which i have adapted here
4.5.3.1 Check Git is installed
In the console window you will see a terminal tab, check Git is installed with which git then git --version you should get a message in response that says where your git installation is and the version you have.
4.5.3.2 Configure your Git
You need to tell Git who you are and your GitHub username. The easiest way is to use the usethis package, you will need to install and library it.
Then, in the console, type the function edit_git_config()
A Git config will load and you need to change your name and email to match GitHub.
If this is empty use the following template and save the file.
4.5.3.3 Start your Git
To start Git you need to be in a RStudio project. You cannot start git without a project! Instructions below show you how to do this in various scenarios. For example, in the first Git way, we clone (copy) a remote repository (of our own) then if we wanted to make changes (to the remote) we would need to follow these instructions to link our Git to GitHub
In the first instance we just copy it from the remote (GitHub), that will have git ready to go - so don’t do this now….but a very simple way is to again load the usethis package in the console and the function use_git(), then type option 1. You would do this for a project that you have started, which doesn’t have git enabled.
Remember that * Github has a maximum file size of 50mb * git does not
This means if you have a file of 50mb or larger you must set the .gitignore to ignore the file or large data folder as soon as you add the data into the project, as shown in the session.
For example, the following means ignore everything (*) in the data folder.
data/*
4.5.3.4 Connect Git to GitHub
Once we have an RStudio project with Git, either making it ourselves or downloading one from GitHub, we need to connect it to GitHub.
From GitHub you need to generate a personal access token. You can use the function create_github_token() from the usethis package or also through
- GitHub > settings > Developer settings > personal access tokens > generate new token.
Use a descriptive name and consider saving the token - it won’t save on GitHub
The last step is to store this token in Git with the gitcreds package > install and load it > then use the function gitcreds_set() > copy your token in.
4.5.4 Using the Git GUI - way 1
- Now you have created your repo online, you need to ‘clone’ it so that there is an identical copy of it in a local folder on your computer.
There are a couple of ways of doing this, one is to use the GUI that comes packaged with your git installation. However, I never use this as RStudio has similar functionality.
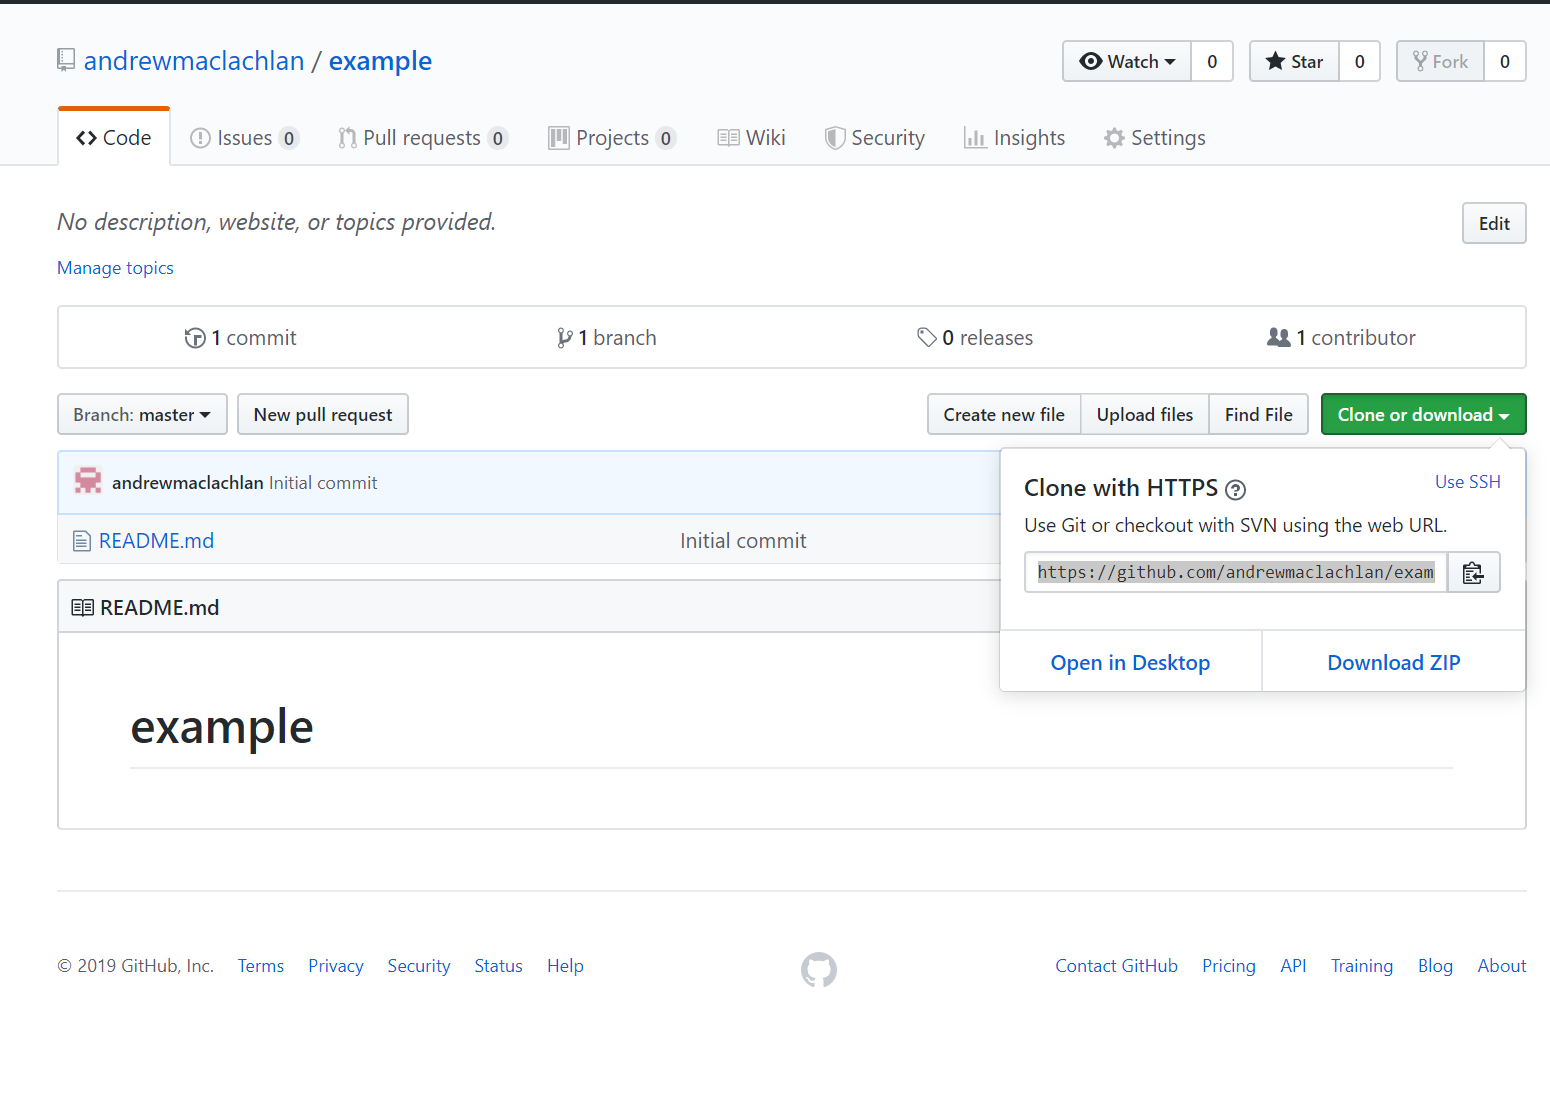
- The first thing you need to do is copy the Clone URL for your repo from the github website — click the green button in your repo for ‘Clone or Download’ and copy the link:
- Now in the windows start menu, go to Git > GUI
Git Graphic user interfaces (GUIs)
Git GUI was downloaded with my version of Git on Windows. There are many Git GUIs to select from. However, the point here is that Git is not specific to programming languages (although it is primary used for code!). It can work on any folder on your computer.
- Select ‘Clone Existing Repository’ and paste the link from your GitHub account into the top box and the local directory that you want to create to store your repo in the bottom box (note, you will need to add a name for a new folder, once you have selected an existing directory, don’t create a new folder in windows explorer you have to specify it in the file path).
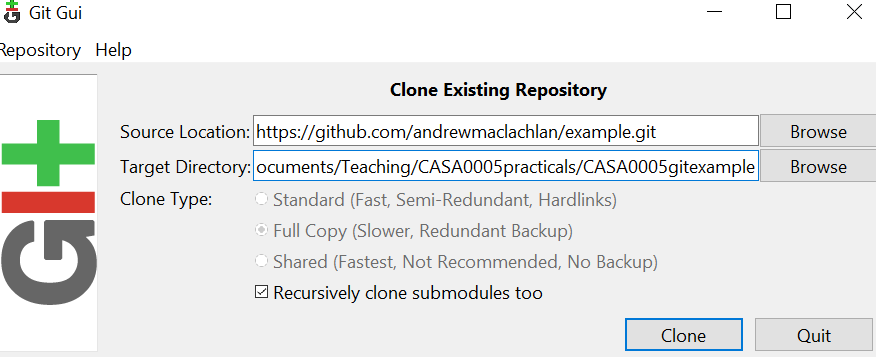
After a few moments, you should now be able to view a copy of your GitHub repo on your local machine. This is where you will be able to store all of your code and some other files for your reproducible research.
Open RStudio and go File > New Project > Existing Directory
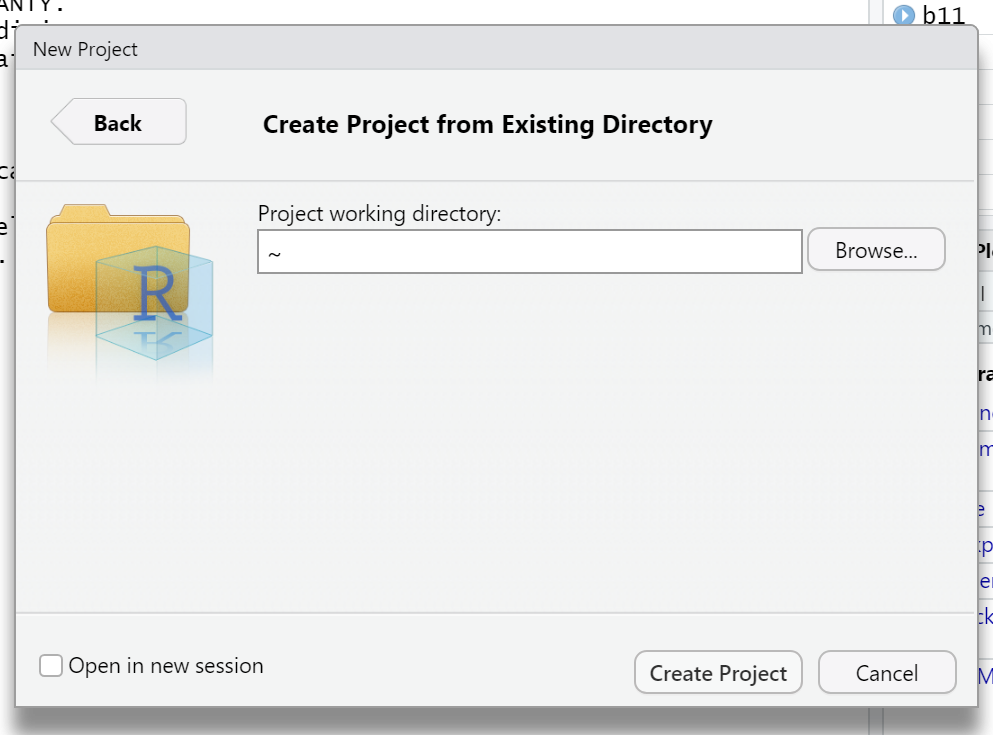
- Set the project working directory to what you specified in the Git GUI target directory. You have now linked your project to your local Git
Note for later, when we try to push to GitHub from RStudio the push button might be geyed out..this is most likely due to your local Git branch not tracking (following) the GitHub branch! I show you how to fix this in the greyed out push button section.
4.5.5 Create a new version control in RStudio - way 2
There is an easier way to set up Git and GitHub with your project, but this assumes you are starting fresh (with no code in an RProject)!
Under Set up your GitHub we made a repository on GitHub. Copy that URL.
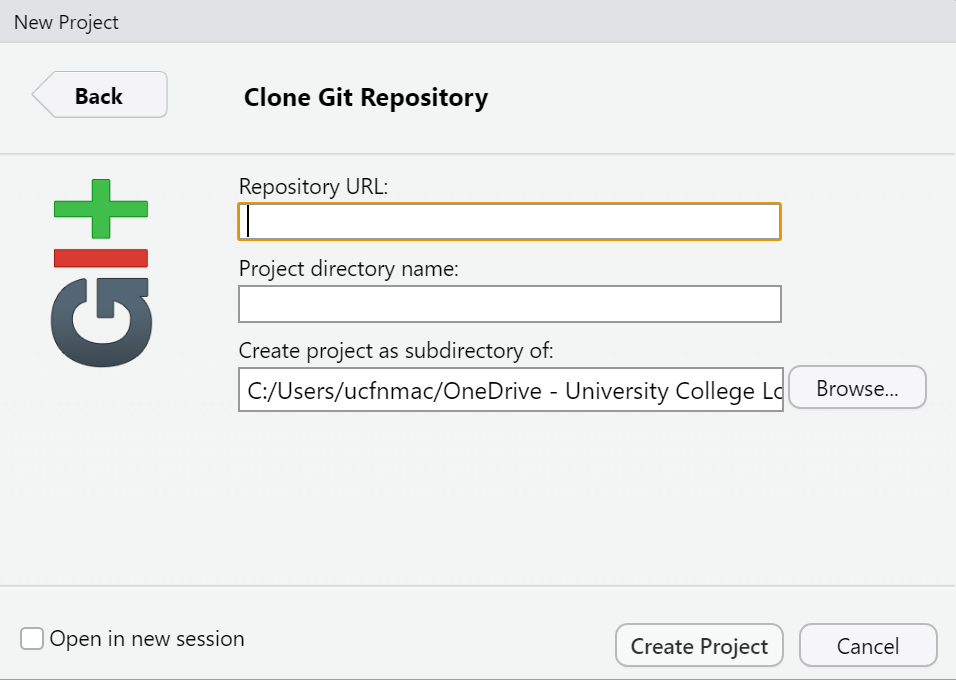
Open RStudio > File New Project > Version Control > Git
Copy in the repository URL and provide a project directory name…but it should populate when you paste in the URL
4.5.6 If have an existing project - way 3
Open RStudio and your existing project (or make a new one…i will make one here). In RStudio Tools > Global Options, under ‘Git/SVN’ check the box to allow version control and locate the folder on your computer where the git.exe file is located — if you have installed git then this should be automatically there. If you make a new project make sure you create a file (
.Ror.Rmdthrough File > New File), add something to it, then save it (File > Save As) into your project folder. When it saves it should appear in the bottom right Files window.Next go Tools > Project Options > Git/SVN > and select the version control system as Git. You should now see a git tab in the environment window of RStudio (top right) and the files also appear under the Git tab. It should look something like this….
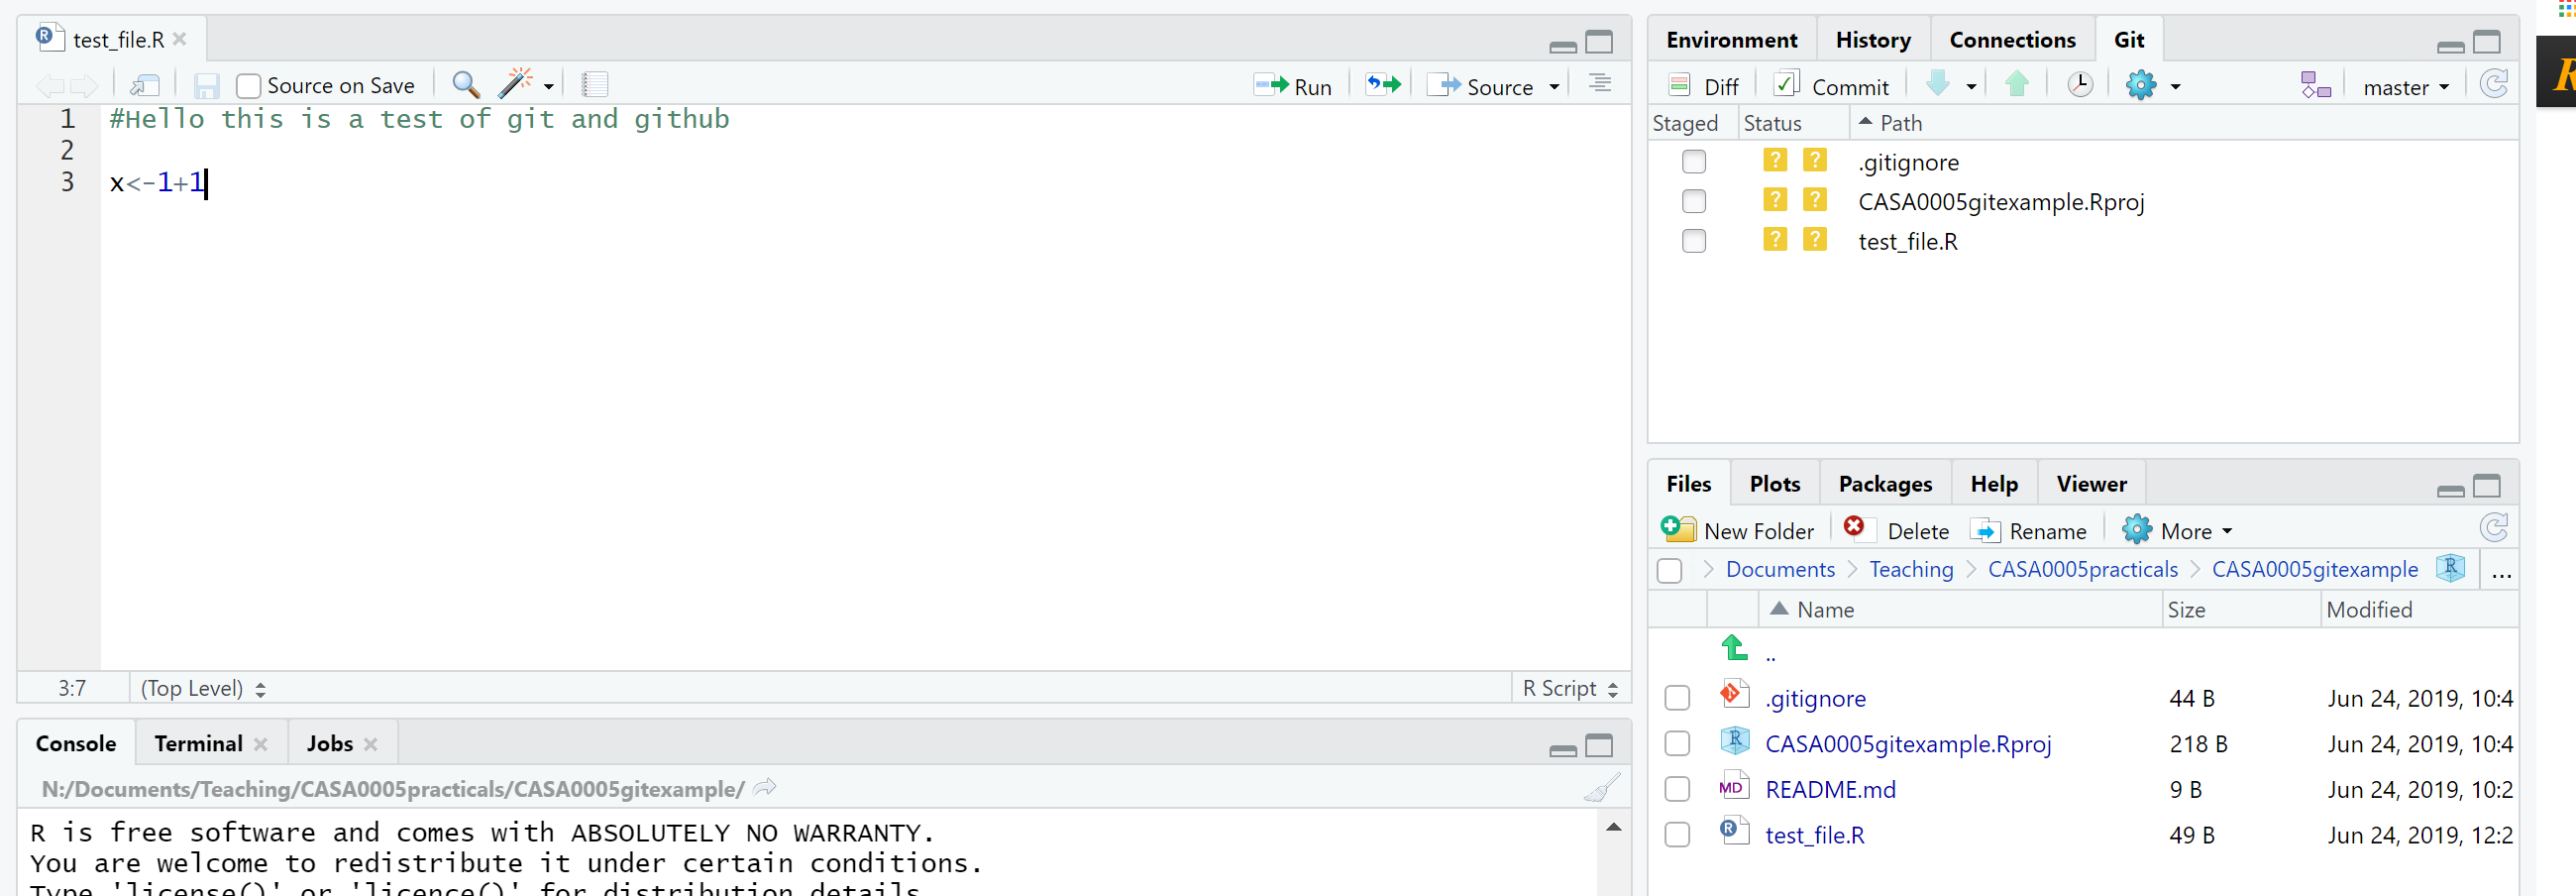
Now you will be able to use Git and GitHub as per the following instructions…
4.5.7 Commiting to Git
As well as saving (as you normally do with any file), which saves a copy to our local directory, we will also ‘commit’ or create a save point for our work on git.
To do this, you should click the ‘Git’ icon and up will pop a menu like the one below:
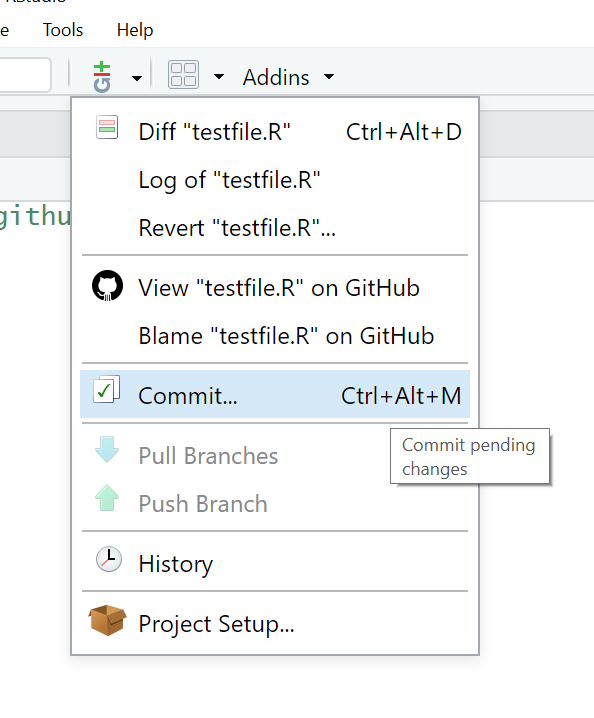
You can also click the Git tab that will have appeared in the top-right window of RStudio. Up will then pop another window that looks a little like the one below:
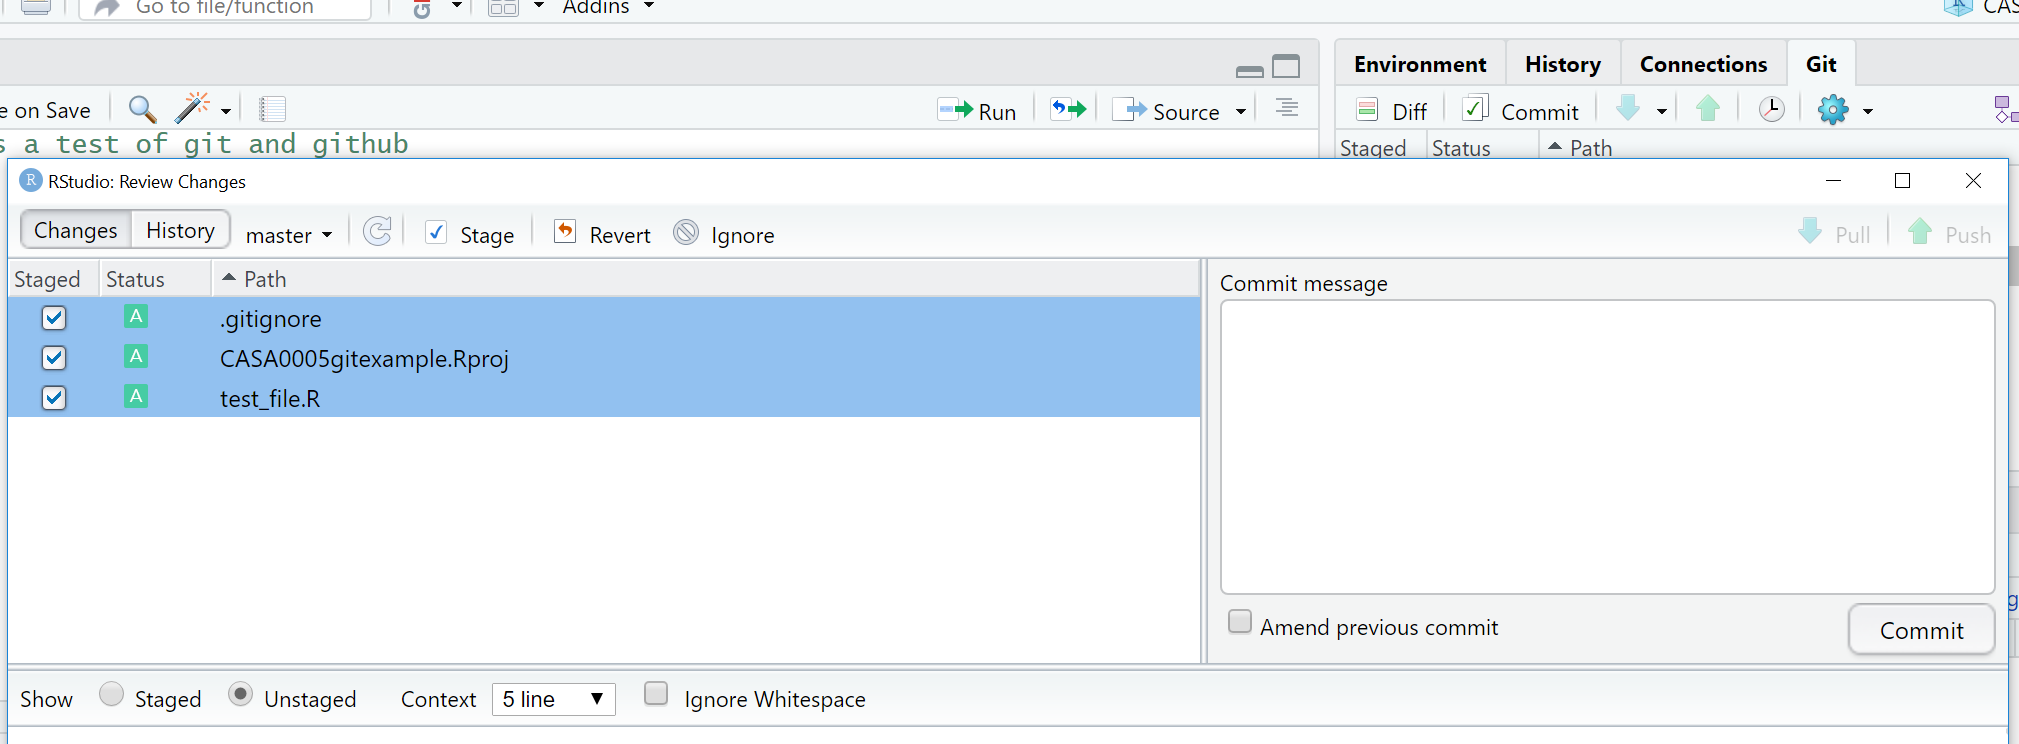
Stage the changes, add a commit message so you can monitor the changes you make, then click commit
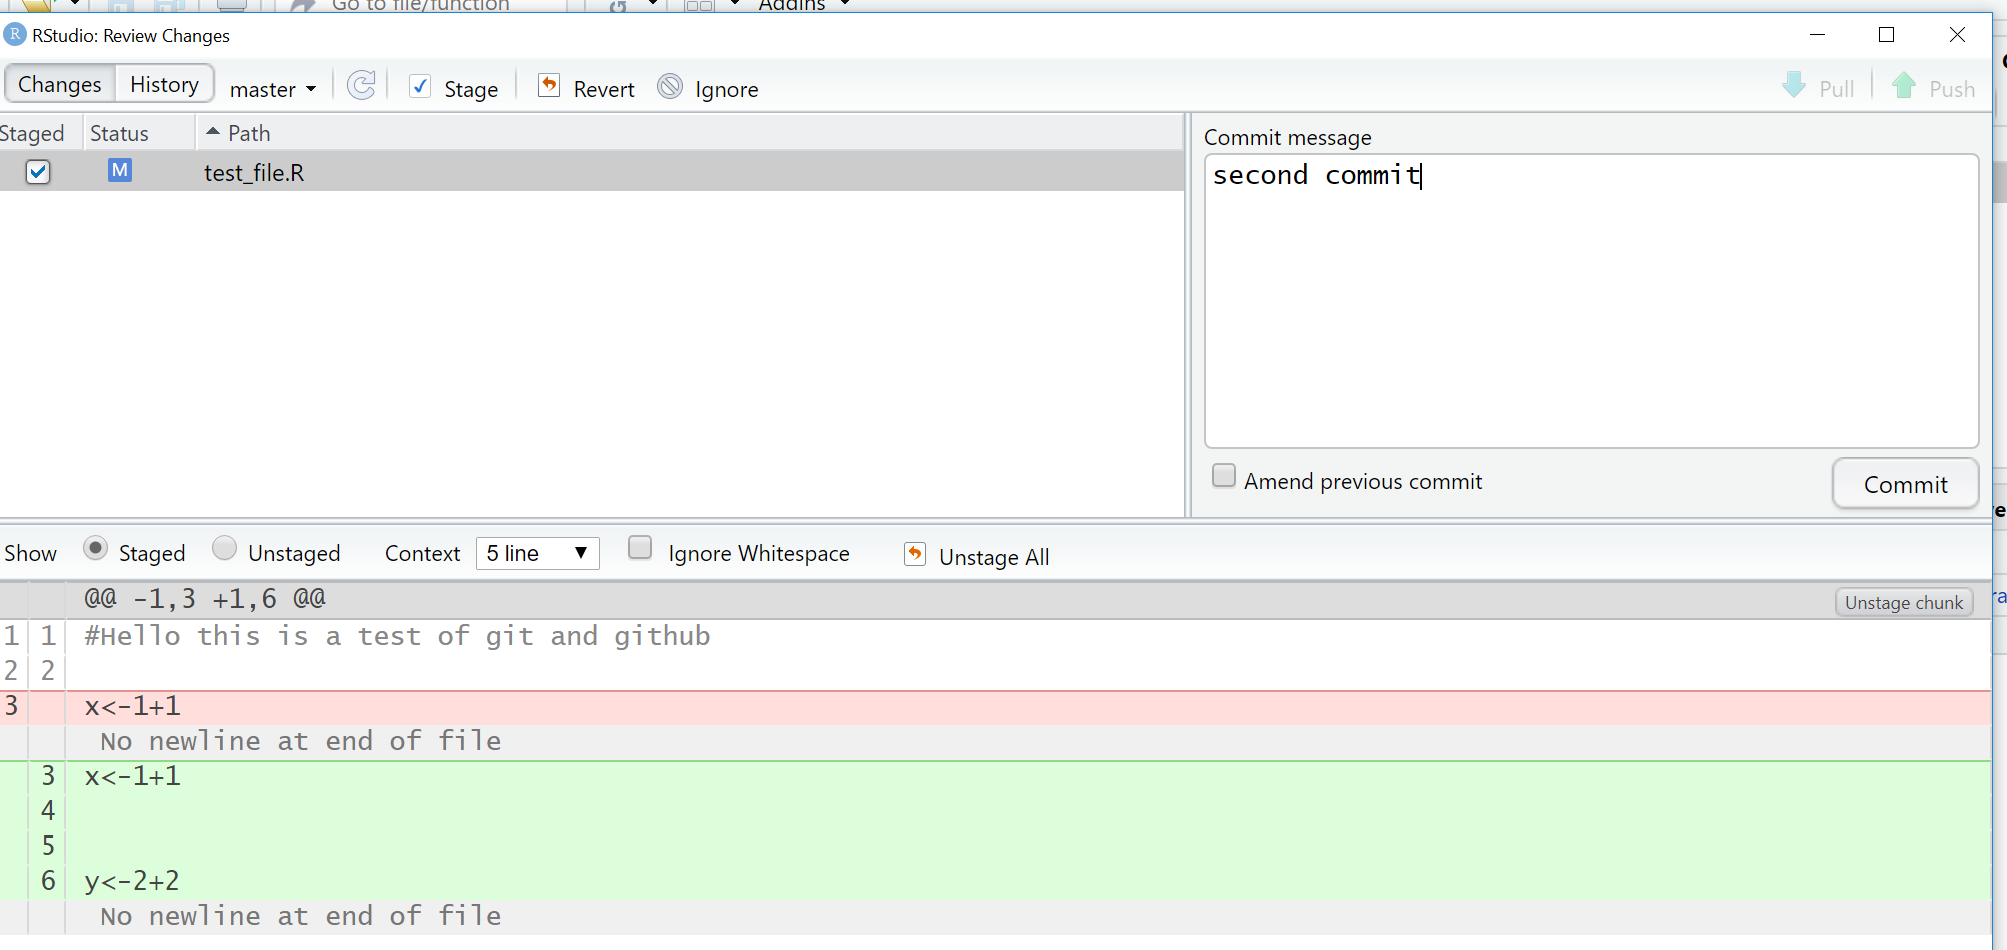
Make some more changes to your file and save it. Click commit again then in the review changes box you will be able to see what has changed within your file. Add a commit message and click commit:
4.5.8 Push to Github
We need to create a new GitHub repo for our local project. Luckily the usethis package can do this for us. Simply type the function use_github() in the console and a new GitHub repo will appear using the name of your project!
Now we can push our changes to GitHub using the up arrow either in the RStudio Git tab (environment quadrant), or from the review changes box (opens when you click commit).
But….if the push button is greyed out go to the section Greyed out push button
4.5.9 Pull from GitHub
Pull will take any changes to the global repo and bring them into your local repo. Go to your example GitHub repo (online) and click on your test file > edit this file.
Add a line of code or a comment, preview the changes then commit directly to the main branch.
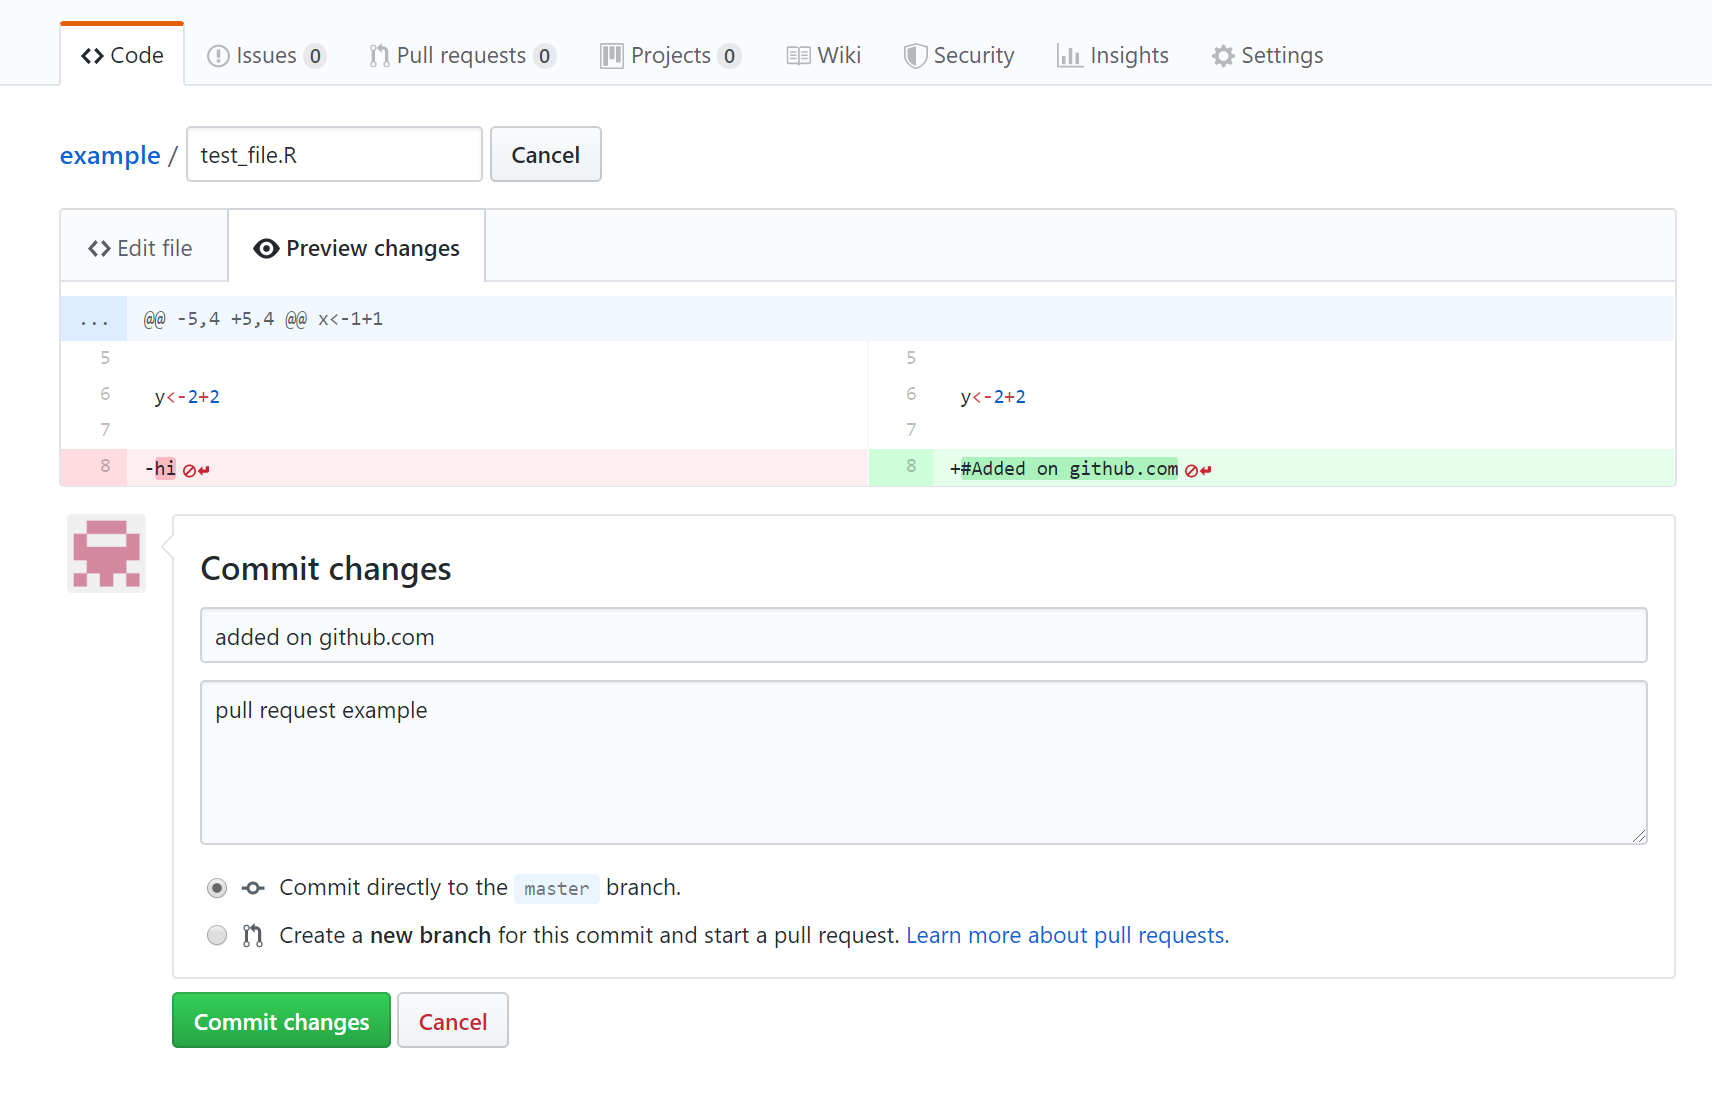
- Now in RStudio click the down arrow (Pull) request. Your file should update in RStudio. If you were to update your file on GitHub and your local one in RStudio separately you would receive an error message in RStudio when you attempted to commit.
4.5.10 Using Git outside RStudio
Sometimes RStudio Git can be a bit temperamental. For example, when staging the files they can take some time to appear with the ticked box (I think this is because we are working from the Network). Normally in RStudio you click the commit button, select to stage all the files, wait a few seconds then close the review changes box and commit from the buttons in the Git tab in the environment quadrant.
Alternatively if you would like to use Git but you’re working on the UCL Remote Desktop or you are experiening other problems with getting git working in RStudio, fear not, you can just use your raw Git installation.
In the Start Menu, open the git GUI. Start > Git > Git GUI. You should open the existing repository that you have just created.
Whenever you have made some changes to your files in your cloned repo, you can use git to review the changes and ‘Commit’ (save) them and then ‘Push’ them up to your main repository on GitHub.
To review and commit your changes, in the commit menu, simply:
- scan for changes
- stage them ready for committing
- commit the changes
- push the changes to your GitHub repo
4.5.11 Troubleshooting
4.5.11.1 Were you challenged for your password?
As of January 2019 it is possible that Git will use a credential helper provided by the operating system. However, as of summer 2021 the token system has replaced this, so this is very unlikely.
You can however set your username and email manually using the git prompt.
Click the “cog” icon under the git tab > New Terminal and enter:
git config --global user.name 'yourGitHubUsername'
git config --global user.email 'name@provider.com'
These only need to be set once.
4.5.12 Fork a repository
A Fork in GitHub is a copy of someone else’s repository to your own GitHub account. You could use it as a base starting point for your project or to make a fix and then submit a pull request to the original owner who would then pull your changes to their repository.
- You can fork a GitHub example repository from: https://github.com/octocat/Spoon-Knife
Once you fork it, you should see it in your repositories
4.5.13 Branches
Each repository you make in git has a default branch but you can create new branches to isolate development of specific areas of work without affecting other branches — like a test environment.
- Go to the test repository you just forked on github. Click the branch drop down and type in the name for a new branch:

Now click on the README.md file > edit this file
Add some changes, preview them and complete the commit changes box at the bottom of the screen.
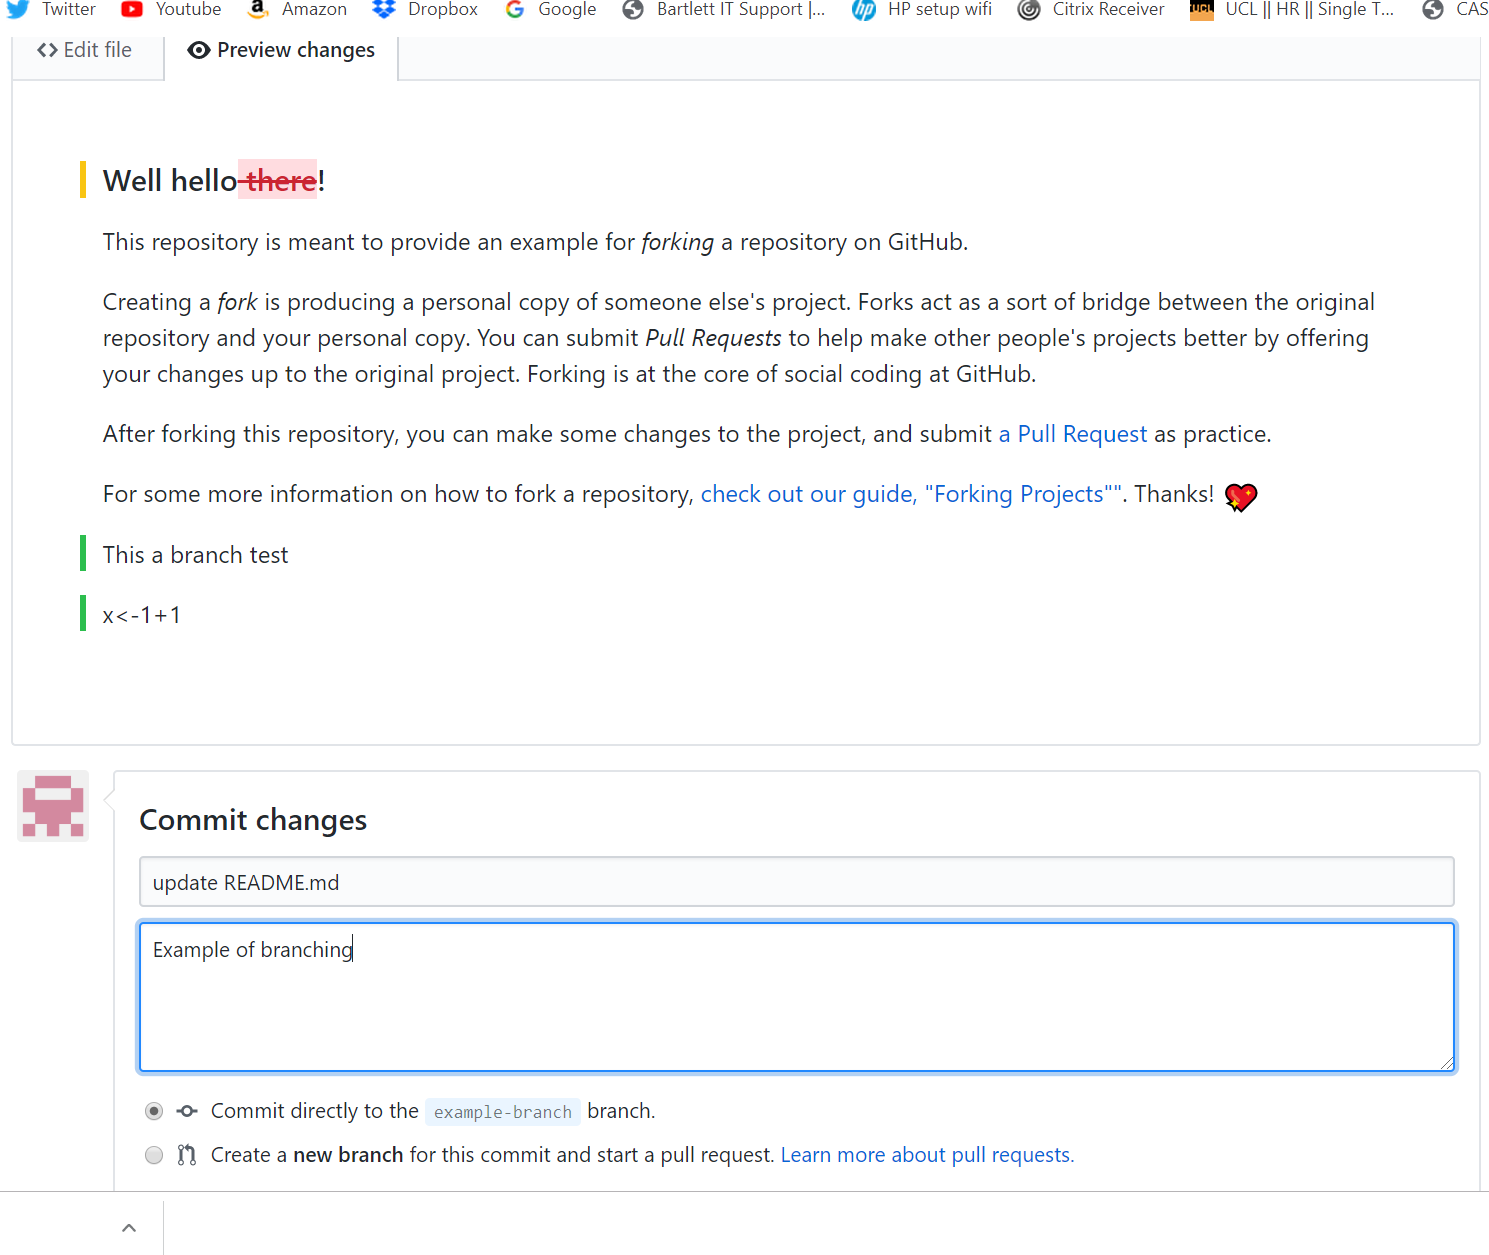
Here, we’re going to commit directly to the new branch. We could have made these changes to the main branch and then made a new branch for them at this stage. Commit the changes.
Go to the home page of our example branch (click the branch down arrow and select your example branch). You’ll see that our example branch is now 1 commit ahead of the main
Now let’s create a pull request to the main branch. If you had modified someone else’s code, then you would send a request to them to pull in the changes. Here we are doing a pull request for ourselves — from our example branch to our main.
Click New pull request.
At the top you will see the branches that are being compared — the base defaults to githubs example repository, change it to yours.
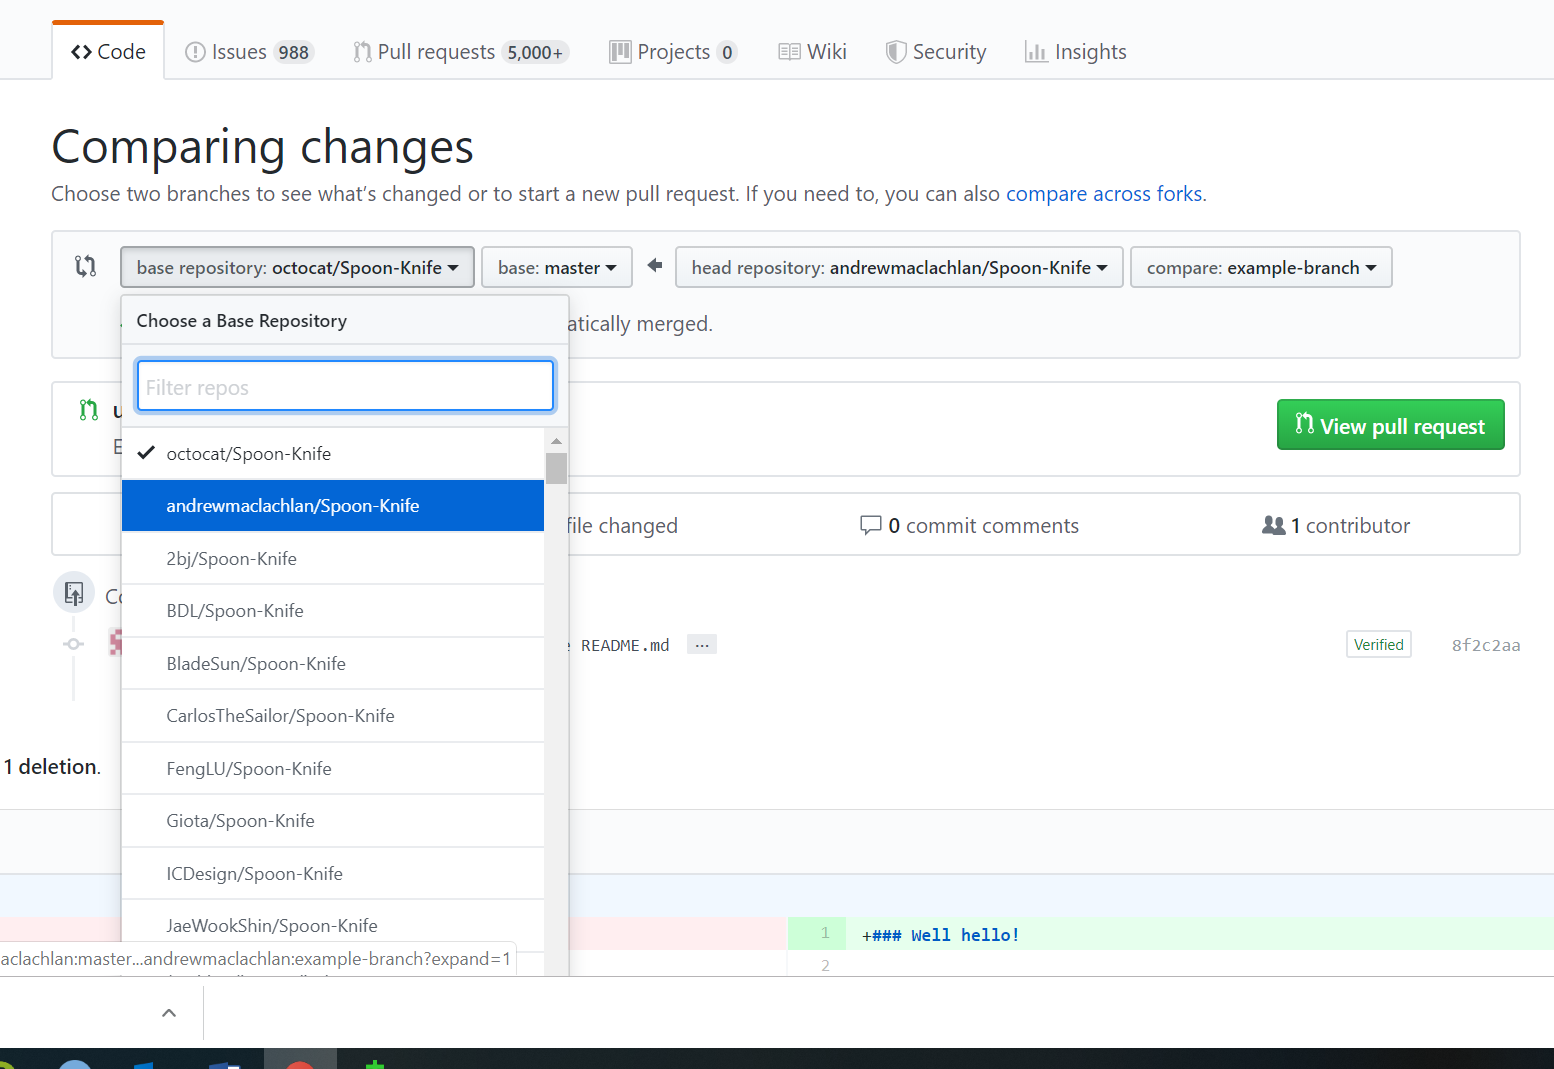
Now scroll down and you will see the comparison of between the two branches. Click create pull request.
Select squash and merge > confirm squash and merge. This means that all our commits on the example branch and squashed into one, as we only have one it doesn’t matter but could be useful in future.
Go back to your main branch repository and you should see the changes from the example branch have been merged.
We will show you how to publish RMarkdown documents online in a later practical.
4.5.13.1 Git commands
If you’d rather use Terminal to control Git then you can. You can start a new Terminal in R through clicking the Git tab (top right of RStudio) > cog icon > New Terminal.
If you have a large project RStudio sometimes has limits on file name length (e.g. this might occur with a book, like this one). To get around this you can use the following commands:
git add .to stage all filesgit commit -m "commit comment"to commit all the staged filesgit pushto push the commited files to the remote
4.5.14 Health warning
To avoid merge conflicts be careful with your commits, pushes and pulls. Think about what you are doing each time. GitHub help pages are quite comprehensive… https://help.github.com/en/articles/resolving-a-merge-conflict-on-github
4.6 RMarkdown
OK, so now you have set everything up so that you can become a reproducible research ninja! All that remains is to do some reproducible research!
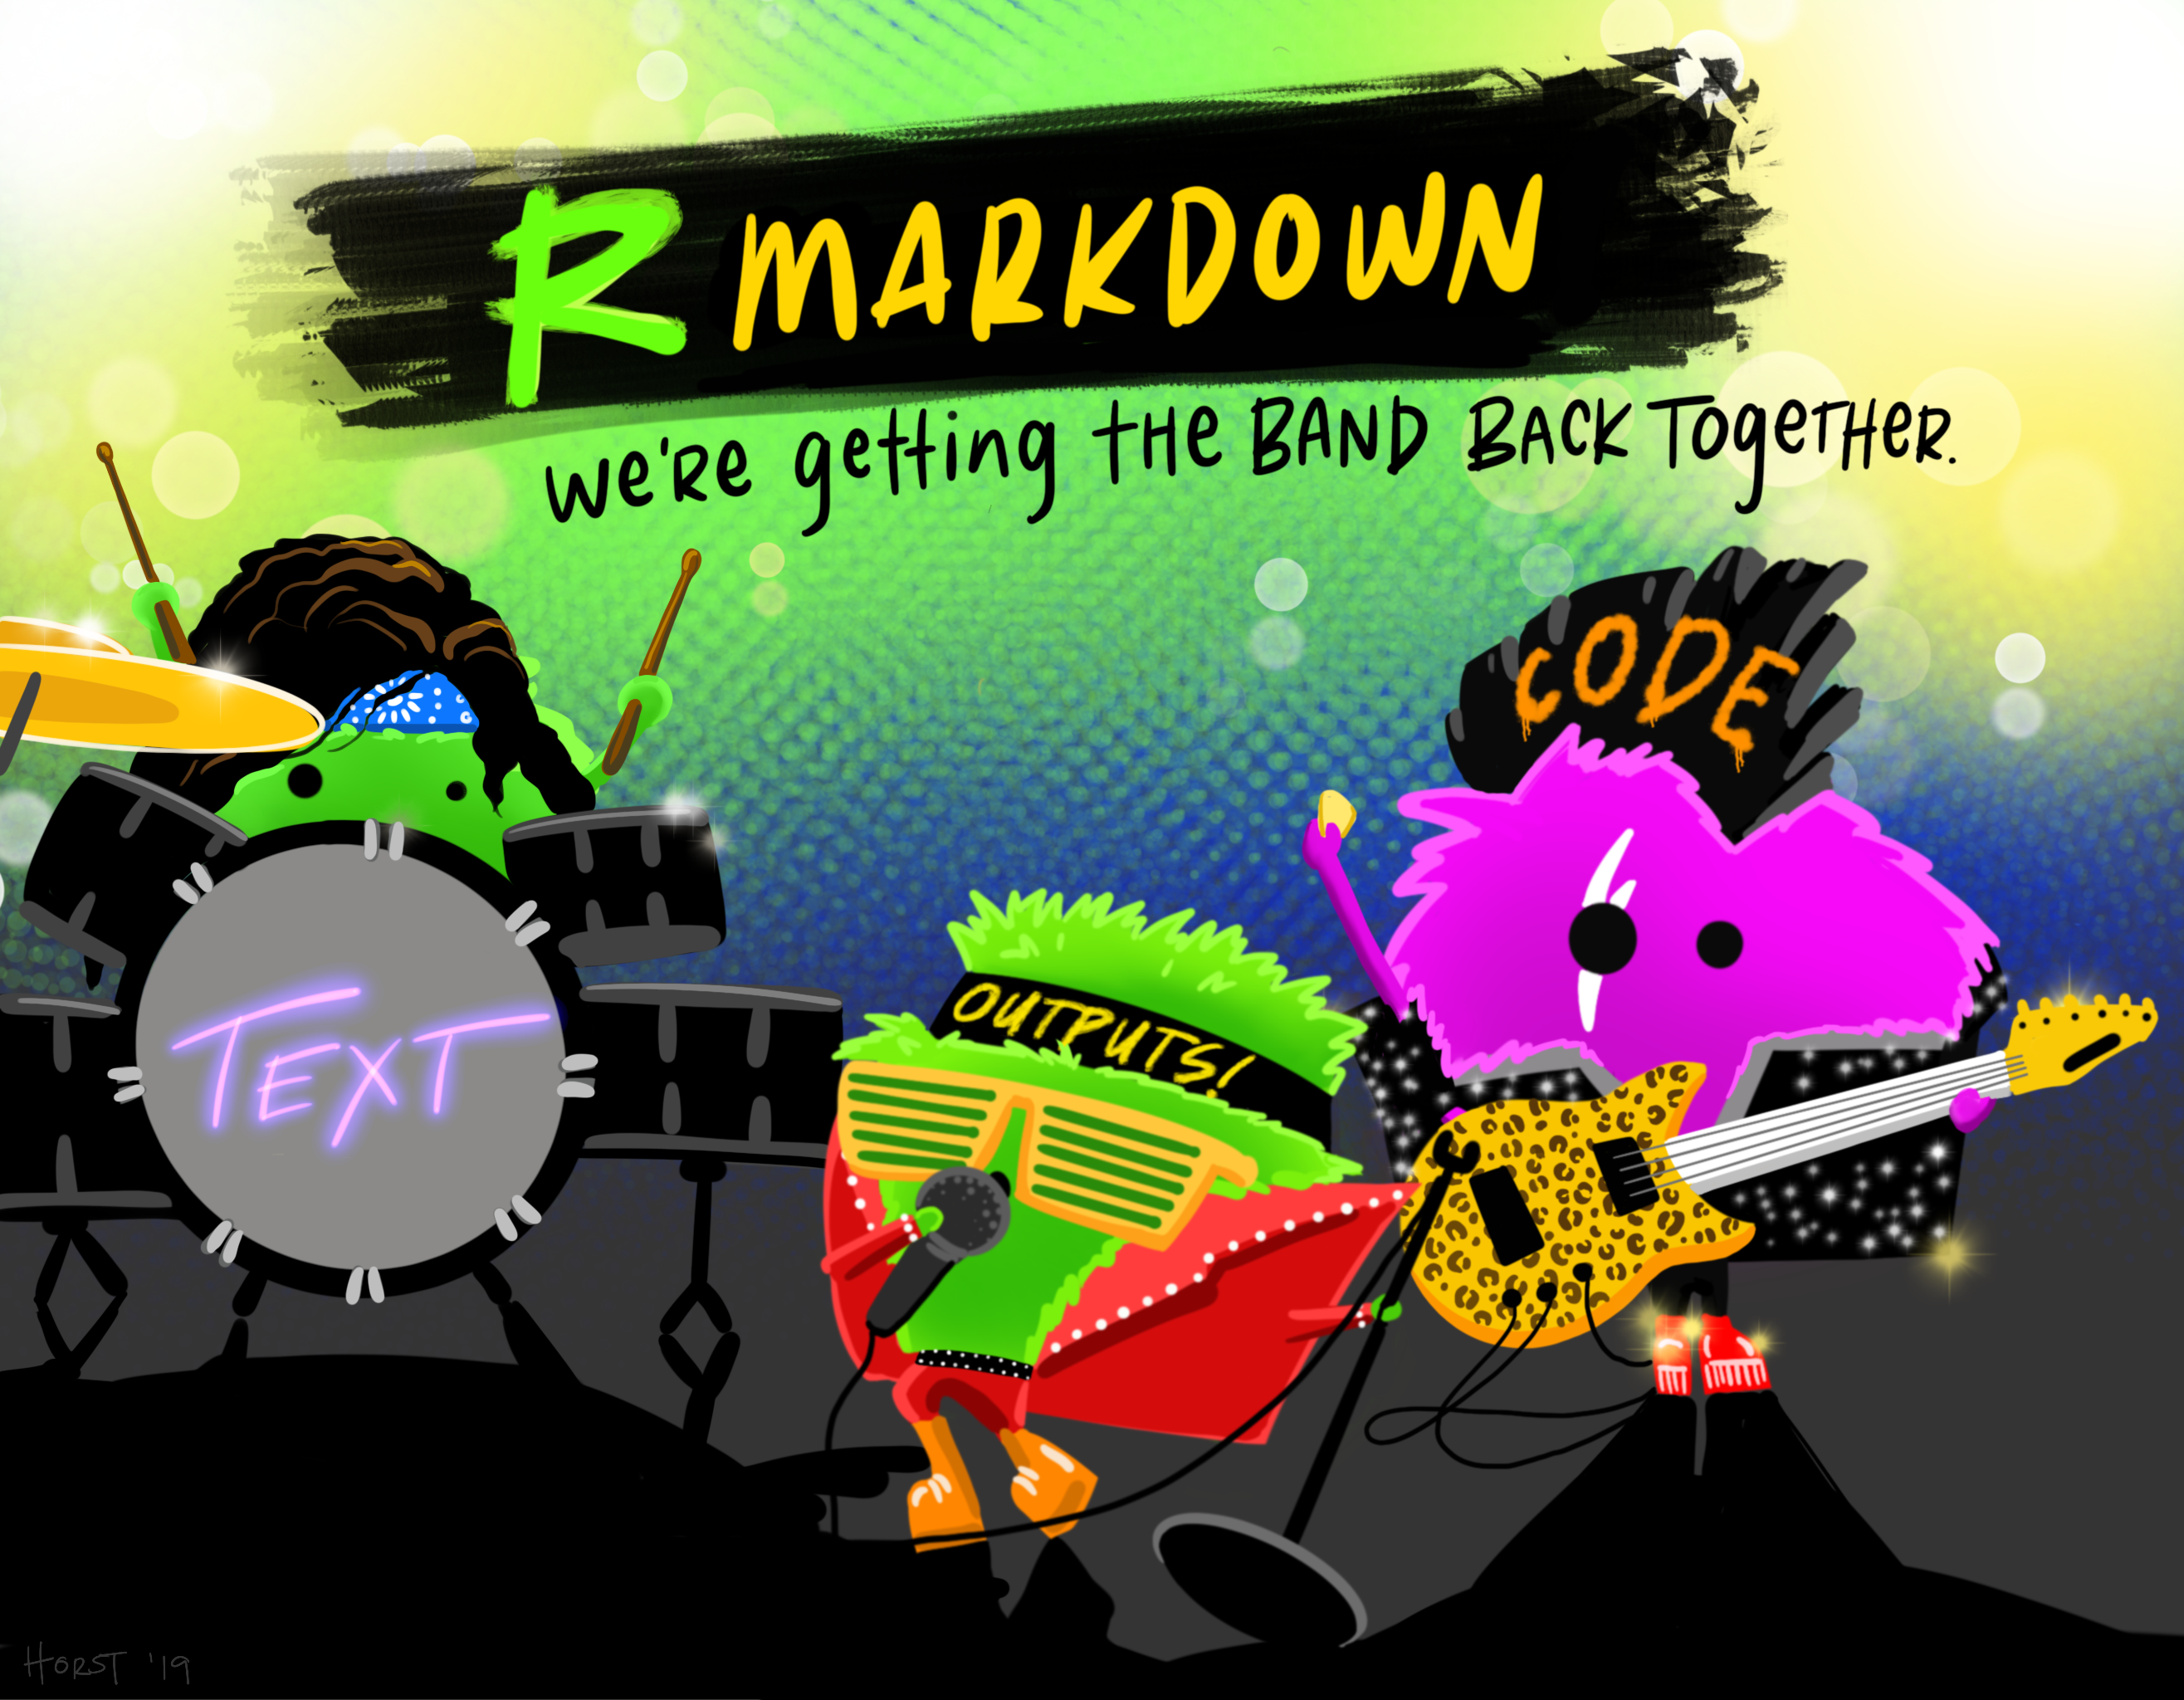
R Markdown is awesome as you can show code, explanations and results within the same document!!!! Often it could be very hard to reproduce results owing to a lack of information in the methodology / userguides or walkthrougts not matching up with the latest version of software. Think back to a time where you had to use software and consult a massive userguide in how to use it…for me it was a very painful experience. R Markdown is a big improvement as it puts all of the information in the same document, which can then be convereted into a range of different formats — html for webpages, word documents, PDFs, blogs, books — virtually everything!
It’s also not limited to R code!!! To change the code language all you have to do is edit what is between the {} in a code chunk. In R by default you get {r}, put for python you just change this to {python}!!! COOL. You’ve also got to have all the python software installed and the R reticulate() package too..
Now, earlier on in this exercise, I got you to open a new R Script. You now need to open a new R Markdown document, you could also select an R Notebook…They are both RMarkdown documents, the notebook originally let you run code chunks that could be executed independently, however you can also now do this if you select a markdown file. To my knowledge the only difference is that a R Notebook adds output: html_notebook in the output option in the header of the file that adds a Preview button in the tool bar. If you don’t have this then the preview option will be replaced with Knit.

But you can mix the output options in your header for the file to get the Preview button back if you wish to. Basically, there isn’t much difference and you can manually change it with one line of code. Have a look at this stackoverflow question for more infomation. For ease i’d just stick with R Markdown files
There are two ways to create an RMarkdown document
File > New File > R Markdown
You can change the type in the bottom right corner of the script window….
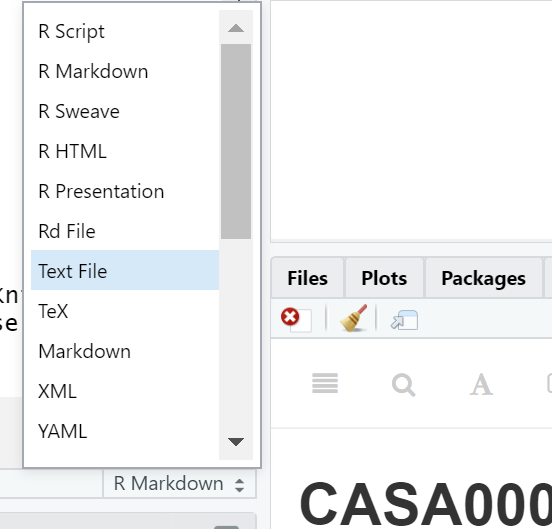
I always use way no.1 (so use that here) and this will be populated with some example data, click Knit to see what it does…the file should load in the viewer pane, if you click the arrow and browser button it will open in an internet browser..

4.6.1 HTML
We are now going to insert some code from the practical last week into the new R Markdown document …clear all of the code except the stuff between the —
In RStudio, you can either select Code > Insert Chunk or you can Click the ‘Insert’ button and insert an R chunk
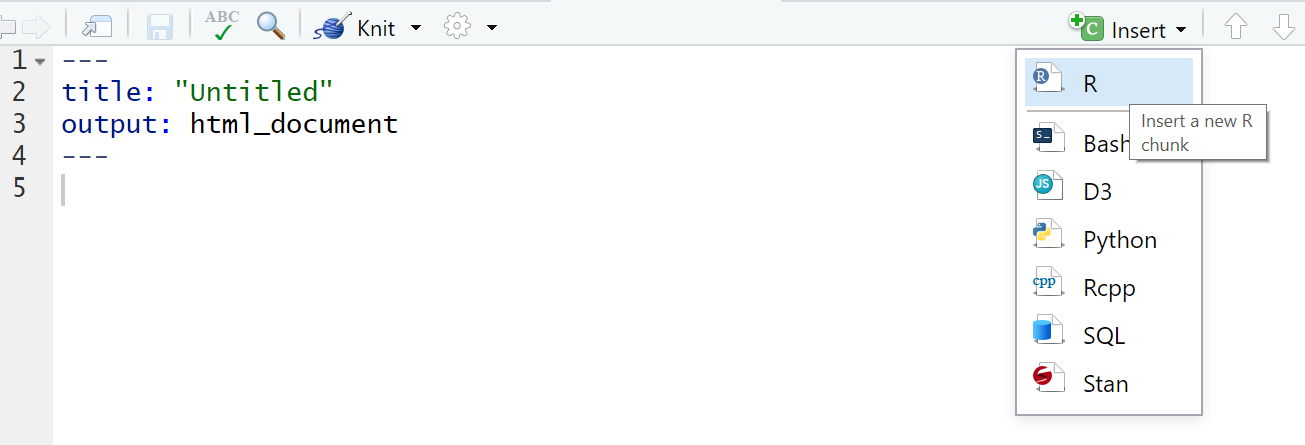
- A box will appear and in this box, you will be able to enter and run your R code. Try pasting in:
library(terra)
library(here)
jan<-terra::rast(here("prac3_data", "wc2.1_5m_tavg_01.tif"))
# have a look at the raster layer jan
plot(jan)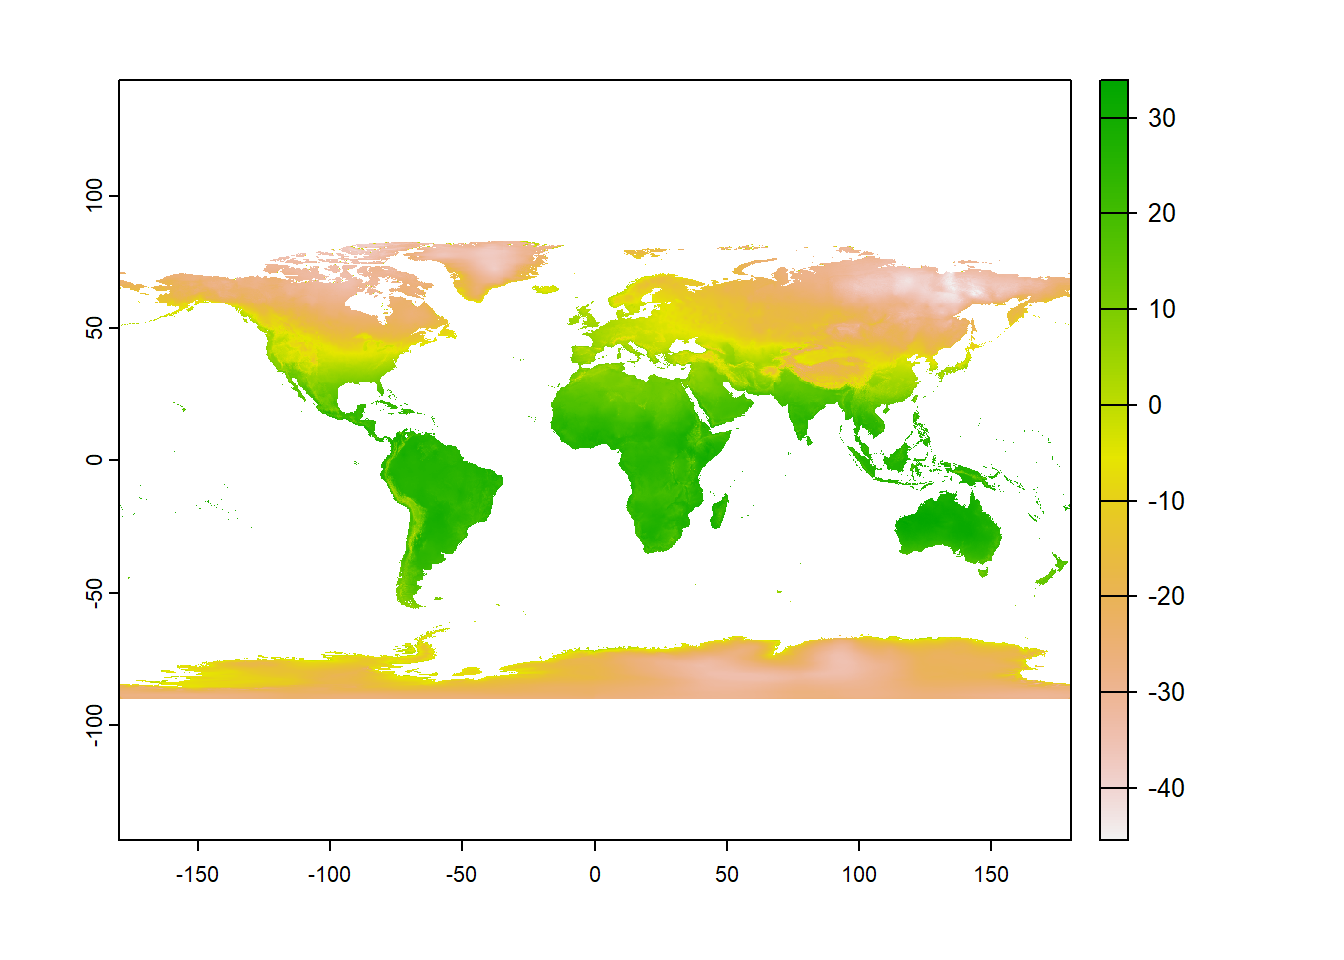
When including code chunks in your work, there are various options that allow you to do things like include the code, but not run it: display the output but not the code, hide warnings etc. Most of these can be input automatically by clicking the cog icon in the top-right of the chunk, or you can specify them in the code header of the chunk…if you toggle the buttons you’ll see the code change in the chunk ‘header’. There are also two useful icons to the right of the settings cog, the first will run all code above the current chunk (play symbol facing downwards) and the second will run the current code chunk (regular play symbol)

4.6.2 Knit options
Various other options and tips can be found in the full R Markdown guide on RStudio here:
- https://rmarkdown.rstudio.com/lesson-1.html
- https://rmarkdown.rstudio.com/lesson-3.html (for code chunk options)
4.6.3 Shortcuts
This Twitter thread started by We are R-Ladies is one of the best resources i’ve found for shortcuts using RMarkdown. Favorites that will help you are:
New code chunk CTRL + ALT + i
New comment in code CTRL + SHIFT + c
Align code consistently CTRL+i
Format ugly code to nice looking code CTRL + SHIFT + A
Insert section label which is fold-able and navigable — this only works in a .R file not a .Rmd but is still useful
CTRL + SHIFT + R
4.7 Further reading
Since starting this little guide, I have come across the book Happy Git and GitHub for the useR on, well, using R and GitHub by Jenny Bryan and Jim Hester. It’s brilliant — get involved!
…Also the GitHub guide
4.8 Feedback
Was anything that we explained unclear this week or was something really clear…let us know using the feedback form. It’s anonymous and we’ll use the responses to clear any issues up in the future / adapt the material.